A Traffic Light For Washing With Solar Power
Washing machine and dryer are the two big consumers where timing really matters: run them while the roof is producing, and the energy costs nothing extra.
The problem is that nobody wants to check charts before starting a load. So I built a small device that shows the answer in traffic light colours — green when there is enough surplus solar power, and so on.
It runs on ESPHome, a free firmware for small chips, and gets its data from Home Assistant. My wife and I just glance at it and know whether now is a good moment.
Designing The Housing For My Solar Advisor
Step two of the little advisor that tells us when to run washer and dryer: giving the electronics something to live in.
I designed the enclosure myself and printed it, which is the part where a project stops looking like a breadboard experiment and starts looking like a device.
Nothing spectacular to watch, but the housing decides whether a build ends up on a shelf or in a drawer.
New Project: Laundry Timed To The Sun
Starting something new on the workbench: a small advisor that says when the washing machine and the dryer should run.
The idea is to line the laundry up with the moments when the solar panels produce more than the house currently needs, instead of guessing or checking an app every time.
Right now this is just the beginning of the project. What the thing will look like and how it will tell us is still open.
Water Meter Readings Straight Into Home Assistant
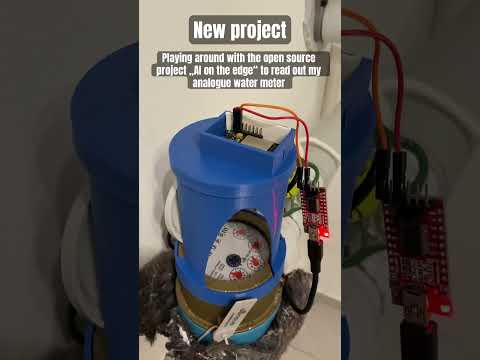
The camera pointed at my old water meter does more than take pictures: it recognises the digits on the dial and turns them into a number.
Behind it runs an open-source project called AI on the edge device, on a small ESP32 camera board — meaning the recognition happens on the board itself, not on some server.
From there the value travels via MQTT, a lightweight messaging protocol for small devices, into Home Assistant, where it lands next to all my other house data.
My Analogue Water Meter Is Now Online
New project in the cellar: reading my purely analogue water meter with a camera and image recognition, so I finally get numbers out of a device that was never meant to deliver any.
The heavy lifting is done by an open-source project called AI on the edge device, running on a small camera board. It looks at the dial and works out the digits.
The goal behind it is simple: knowing where the water actually goes is the first step to using less of it.
Charging The Electric Car With Surplus Solar
The car sits in the driveway during exactly the hours when the roof produces the most. That is too good a match to leave to manual switching.
So the charging is controlled by my smart home: it uses the solar energy that would otherwise go out to the grid, rather than pulling power at random times.
The interesting part is the decision logic — how much surplus is enough to start, and what happens when a cloud passes over.
Using The Hot Water Tank As Energy Storage
Feeding surplus solar power into the grid pays badly at our tariff, so using it ourselves is clearly the better option.
My current experiment: treating the hot water tank of the heat pump as an extra store for that surplus. Water holds heat well, and we need hot water anyway.
An automation sets the target temperature of the tank depending on how much the panels are producing at that moment. All the data sits in Home Assistant and the heat pump can be controlled remotely, which is what made this possible at all.
A Leak Sensor After Water Got Into The House
During heavy rain, one of the light shafts at our basement windows filled faster than it could drain. At some point the pressure was too much for the window and water came inside.
We were lucky twice over: someone noticed it straight away, and the rain stopped soon after. But it was a clear warning that a longer downpour could flood the cellar.
Making the shafts and windows properly watertight is the real fix and will take time. As an interim measure I installed a Zigbee leak sensor — a small battery device that raises an alarm as soon as it feels water.
Bringing the 3D printer into Home Assistant
My 3D printer used to live in its own little world. Now it reports into Home Assistant, the software that runs everything in our house, so its status shows up next to the lights and sensors.
The bridge is OctoPrint, a small server that sits in front of the printer and speaks to it on my behalf. Once that link exists, the printer stops being an isolated machine.
It is a short clip, but for me it closed a gap that had bugged me for a while.
A printed mount for the gas bottle scale
Step three of my attempt to weigh the gas bottle: the load cell needed something solid to sit in. A load cell is the small metal bar that turns weight into an electrical signal.
So I designed and printed a holder for it. Without a proper mount, the bar bends in ways it should not, and the reading becomes useless.
Nothing spectacular to look at, but it is the part that decides whether the rest of the project works.
Garage door stops when a car blocks it
A car parked too close to the garage can end badly for both the car and the door. I wanted the door to simply refuse to move in that situation.
The setup uses an ultrasonic sensor, which measures distance with sound pulses the way a parking aid does. It runs on a small chip programmed with ESPHome, a tool that makes such sensors talk to Home Assistant without much code.
The sensor sits in a printed holder outside, and Home Assistant blocks the door as long as something is standing in front of it. The holder and the code are published for anyone who wants to copy it.
First prototype for the gas bottle scale
Second step of the gas bottle project: getting the parts together into something I can actually test.
Up to now it was loose components on the bench. Building a prototype forces me to decide how everything sits and connects before I worry about accuracy.
From here I can finally put weight on it and see whether the idea holds up.
Wiring the amplifier for the gas bottle scale
The very first step of weighing our gas bottle is unglamorous: preparing the amplifier board that belongs to the load cell.
The signal coming out of a load cell is tiny. The amplifier turns it into something a microcontroller can actually read.
Seven seconds of soldering and sorting wires, and the measuring chain has its first working link.
Car detector mounted on the charger
The car detector has left the workbench. It now sits on our EV charger in a holder I designed and printed for exactly that spot.
From there it watches whether a car is standing in front of the garage, and Home Assistant knows about it.
Building it was one thing. Seeing it in its final place, reporting real values, is the part that makes it feel finished.
How much gas is left in the bottle
Our gas bottle gives no hint about how full it is, which usually means it runs empty at the worst moment.
My idea: put it on a load cell, the sensor that converts weight into a signal, and let the remaining amount be derived from what the bottle still weighs.
This clip is the starting point of that project, before any of the practical problems showed up.
Sensor holder printed and mounted outside
Fourth step of the garage project: the holder came off the printer and went straight onto the charger.
The ultrasonic sensor, which measures distance using sound, needs to point at the parking spot at a stable angle. A wobbly mount means changing readings for no reason.
With the sensor in place, the outdoor side of the setup is done and the software can take over.
Designing the holder for the distance sensor
Before anything gets printed, the holder has to exist as a drawing. In this step I model the part that will carry the ultrasonic sensor on our EV charger.
It has to hold the sensor firmly, keep it aimed at the right spot, and still fit a surface it was never meant for.
Designing around existing hardware is usually the slowest part of these projects, and the one nobody sees later.
Slug detector running end to end
For the first time the slug detector runs as one complete system instead of separate pieces on my desk.
Camera, recognition and the connection into our smart home finally work together in a single pass, without me starting anything by hand in between.
That moment when the individual parts stop being individual parts is my favourite in any build.
Slug detector assembled for the first time
The slug detector now exists as a physical object rather than a pile of parts and a plan.
Everything is put together in one housing so I can carry it outside and see how it behaves in the raised bed instead of on my bench.
Whether it actually spots anything reliably is the next question. First it had to become one piece.