There’s nothing quite like the frustration of running out of gas in the middle of a BBQ. You’ve invited friends and family over, prepped all the grillables, and then – disaster strikes. The grill won’t light, or worse, it goes out mid-cook. But worry no more! In this post, I’ll show you how to set up a smart notification system using Home Assistant that will remind you when your gas grill tank is nearly empty.
Why Smart Notifications for Your Gas Grill?
Using smart notifications to monitor your gas tank can save your BBQ from being ruined. By receiving alerts when the gas level is low, you can ensure that you always have a full tank ready to go. This is especially useful during peak grilling season when running out of gas can put a damper on your outdoor gatherings.
The solution I built for solving this problem is a smart battery-operated gas bottle scale which sits below the gas bottle and monitors its weight. The measurements are transferred to Home Assistant and can trigger automations which can for example send out notifications to your smart phone and smart speaker. Here is the detailed video tutorial:
What we need
This is the list of required parts & tools for this tutorial:
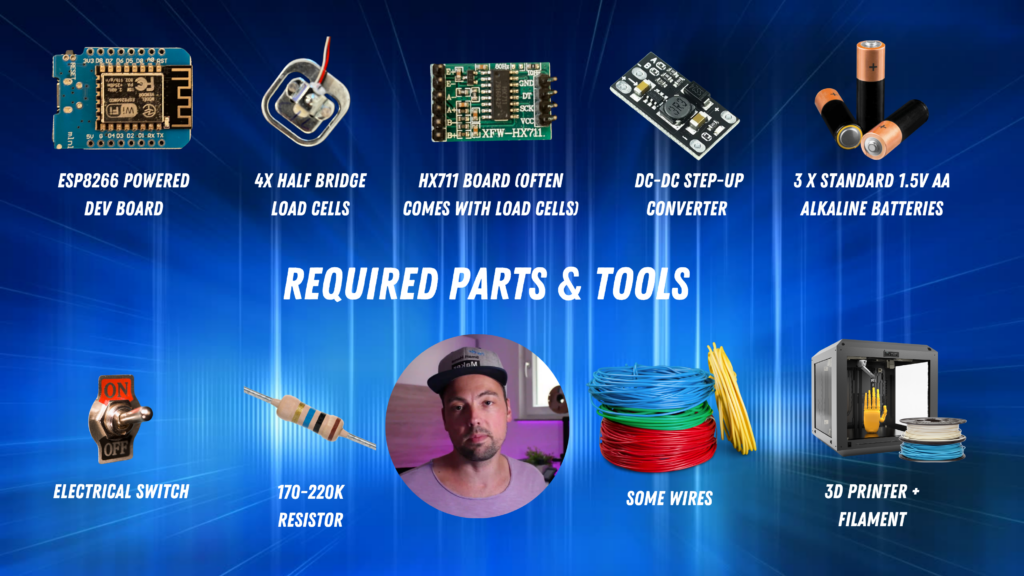
Besides the listed parts and tools, we also of course need an ESPHome and Home Assistant installation.
Wiring scheme
The following image shows the wiring scheme. The wiring is a little more complex for this project, so please pay close attention to wire everything correctly. I also don’t take any responsibility for errors in the diagram shown.
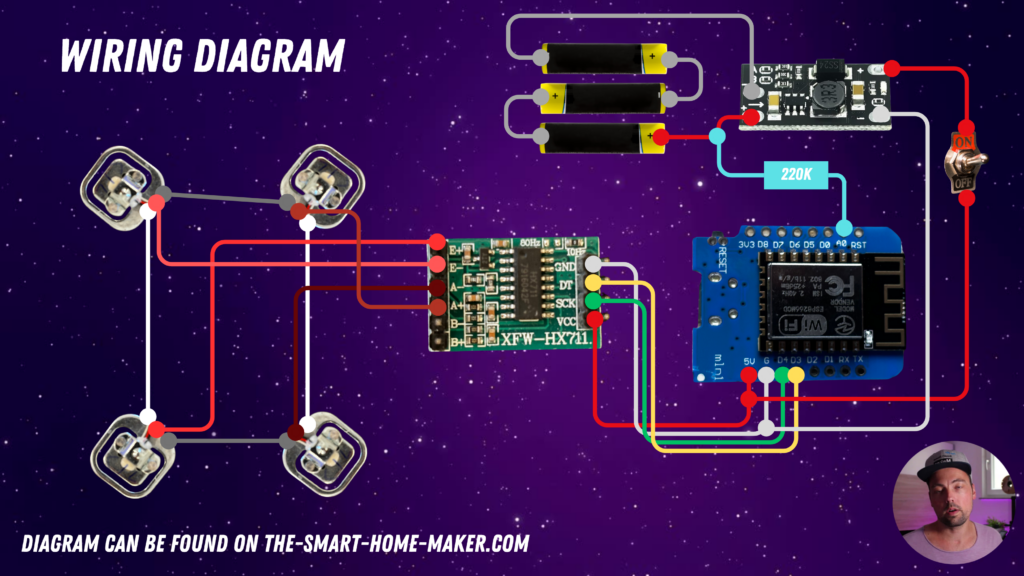
As you can see in the diagram, we need to wire the four load cells first and connect them to the HX711 board. Then we connect the HX711 board to the D1 mini board. Next step is to connect the 3 batteries in series and connect them to the DC-DC step up converter that should generate constant 5V for the power supply of the whole system. We also add a wire including a 170K-220K ohm resistor from the battery voltage to the A0 analog-digital converter input of the D1 mini in order to read the battery voltage (to see whether the batteries are full or empty). And we add an electrical switch to be able to turn on/off the whole system easily.
Housing
I designed a housing for the gas bottle scale. The housing consists of an upper part that can move up and down and a bottom part that carries all the electronics as well as the load cells. The upper part then pushes down the load cells to make them measure the weight of the gas bottle. I have uploaded the STL files to printables:
https://www.printables.com/de/model/908600-gas-bottle-scale
You can print the housing on a 3D printer or – if you don’t have one at hand – just use an online service for 3D printing. But be aware that these prints take a long time. The bottom part took me about 18h to print, the upper part about 15h. So it might also get a little more expensive when printing it at an online service.
Connect and solder everything together
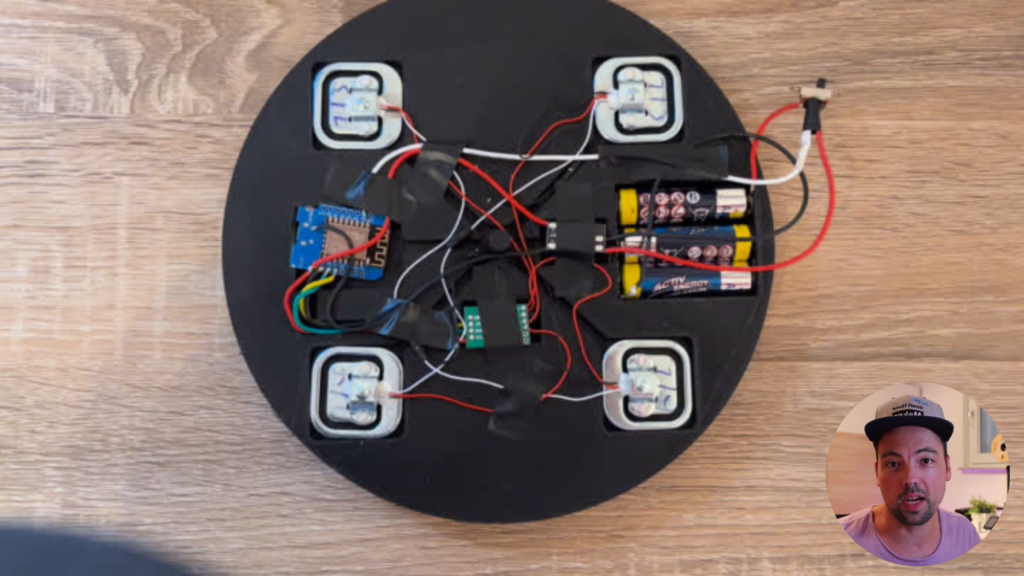
After having printed the housing, we can put everything together. this also requires some soldering to connect the wires with the D1 mini. In this case, one should not work with jumper wires (because this would just take too much space vertically) but rather connect the wires directly to the D1 mini.
ESPHome YAML code
Once you have created the prototype, it is time to flash the D1 mini with the required firmware. The following example YAML code can be used:
substitutions:
  name: "gas-bottle-scale"
  friendly_name: gas_bottle_scale

esphome:
  name: ${name}
  friendly_name: ${friendly_name}
  name_add_mac_suffix: false
  project:
    name: esphome.web
    version: '1.0'
  on_boot:
    priority: -100.0
    then:
      - delay: 1s
      - script.execute: test_ota

esp8266:
  board: esp01_1m

# Enable logging
logger:

# Enable Home Assistant API
api:

# Allow Over-The-Air updates
ota:

wifi:
  ssid: !secret wifi_ssid
  password: !secret wifi_password

  # Enable fallback hotspot (captive portal) in case wifi connection fails
  ap:
    ssid: "gas-bottle-scale"
    password: "XNRwyVDfA2f7"

# In combination with the `ap` this allows the user
# to provision wifi credentials to the device via WiFi AP.
captive_portal:

sensor:
  - platform: hx711
    id: gasbottle_weight
    name: "Gasbottle Weight"
    dout_pin: GPIO0
    clk_pin: GPIO2
    gain: 128
    update_interval: 1s
    filters:
      - calibrate_linear:
          - 82000 -> 0
          - 81300 -> 1
      - quantile
    unit_of_measurement: kg
  - platform: adc
    id: battery_charging_adc
    name: "Battery charging ADC value"
    pin: A0
    update_interval: 5s
  - platform: template
    name: "Battery charging state"
    unit_of_measurement: '%'
    update_interval: 5s
    lambda: |-
      return (((id(battery_charging_adc).state -0.666)/0.25) * 100.00);
  - platform: template
    name: "Gasbottle fill state"
    unit_of_measurement: '%'
    update_interval: 1s
    lambda: |-
      return ((id(gasbottle_weight).state - 3 / 5) * 100.00);

binary_sensor:
  - platform: homeassistant
    id: otamode
    entity_id: input_boolean.esphome_deep_sleep_devices_ota_mode

deep_sleep:
  run_duration: 1min
  sleep_duration: 59min
  id: deep_sleep_handler
script:
  - id: test_ota
    mode: queued
    then:
      - logger.log: "Checking OTA Mode"
      - if:
          condition:
            binary_sensor.is_on: otamode
          then:
            - logger.log: 'OTA Mode ON'
            - deep_sleep.prevent: deep_sleep_handler
          else:
            - logger.log: 'OTA Mode OFF'
            - deep_sleep.allow: deep_sleep_handler
      - delay: 2s
      - script.execute: test_ota

text_sensor:
  - platform: wifi_info
    ip_address:
      name: ESP IP Address
Some things have to be explained in more detail.
Deep sleep & OTA mode
As this device is battery operated, I use the so called “deep sleep” mode of the ESP8266 which requires way less energy than running at full power. So for the first prototype, my device runs 1 minute at full power, reporting measurements, and then goes to deep sleep for 59 minutes. So there is only measurements made once per hour which is definitely sufficient. In the end, you can probably go down even further to every 12h or every 24h as the gas bottle will probably only empty after grilling and you probably don’t grill multiple times a day. This helps saving energy on the batteries!
But the deep sleep comes with the drawback that updating the firmware via OTA is quite difficult as you have to make sure that the device is online when running an OTA update but if the device is only online 1 minute per hour, this period might be hard to hit. Therefore, I introduced a so called “OTA mode”. I have a binary sensor “OTA mode” which I import from Home Assistant. If this sensor is set to true, the ESPHome YAML code shown above will prevent deep sleep. If the binary sensor is set to false, deep sleep will be enabled again. With this, I can easily prevent the deep sleep comfortably from within Home Assistant!
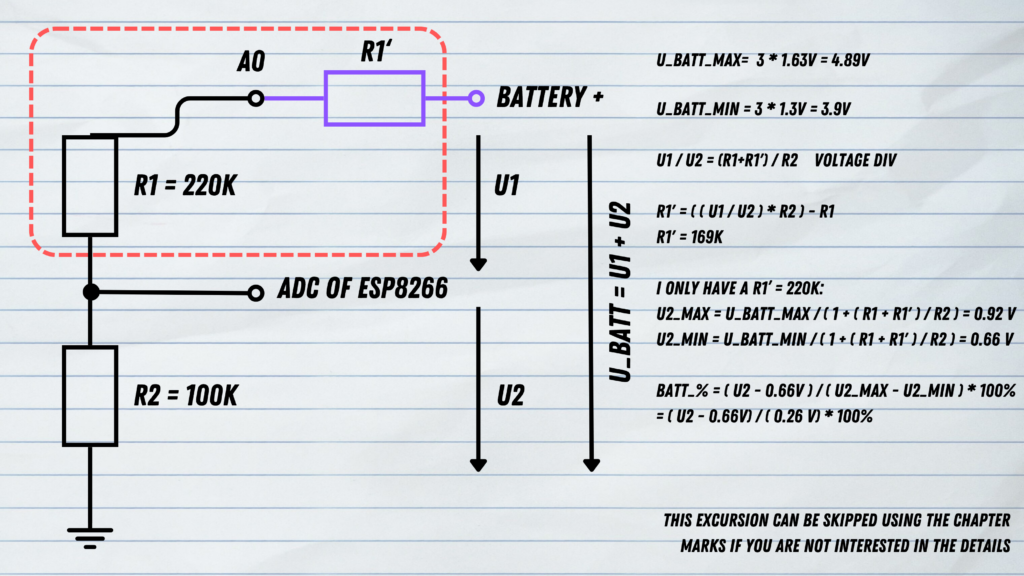
Battery percentage calculation
In the code above, you can see a battery percentage calculation which might be hard to understand.
    lambda: |-
      return (((id(battery_charging_adc).state -0.666)/0.25) * 100.00);
I have therefore created the following illustration that should help to understand it. But please also use the YouTube video linked above as this contains the detailed explanation.
Calibration of the load cells
You have to make sure to calibrate the load cells in order to get accurate measurements. In the code above, you can see the following calibration:
filters:
      - calibrate_linear:
          - 82000 -> 0
          - 81300 -> 1
      - quantile
    unit_of_measurement: kg
But this needs to be adjusted to your specific setup. Once you have compiled the ESPHome YAML code and flashed the binary to the ESP8266, the ESP8266 will log the sensor readings. With the sensor readings in the log, you can now first of all identify the “zero point” which means the point when no weight is applied to the scale. Afterwards, you can put a well known weight onto the scale, for example with 1kg. And then you can replace the values in the code snippet above.
Try it out
Once you have flashed the firmware, it is time to try the prototype out. I hope it works!

Comments are closed