Worried of big tech spying on you? Ditch Alexa for a local (no cloud) voice assistant! (Part I – prototype)
Have you ever wondered how you can replace your voice assistant such as Amazon Alexa or Google Home with a local voice assistant that does not send your voice data around the globe but handles everything locally in your house, because you are worried about how the big corporations are using your data? Or you are just not satisfied about the features and the smartness they offer and want to be able to add your own functionality?
If your answer is “yes”, then this post series is perfect for you. I will show you in different episodes how you can build your own, local voice assistant.
In this first episode, I am going to focus on building a rough prototype. In the upcoming episodes, we will build a housing and make the assistant even smarter!
The following video will give you an overview of what is going to happen. All steps will be explained in more detail in the following article.
Overview of the architecture
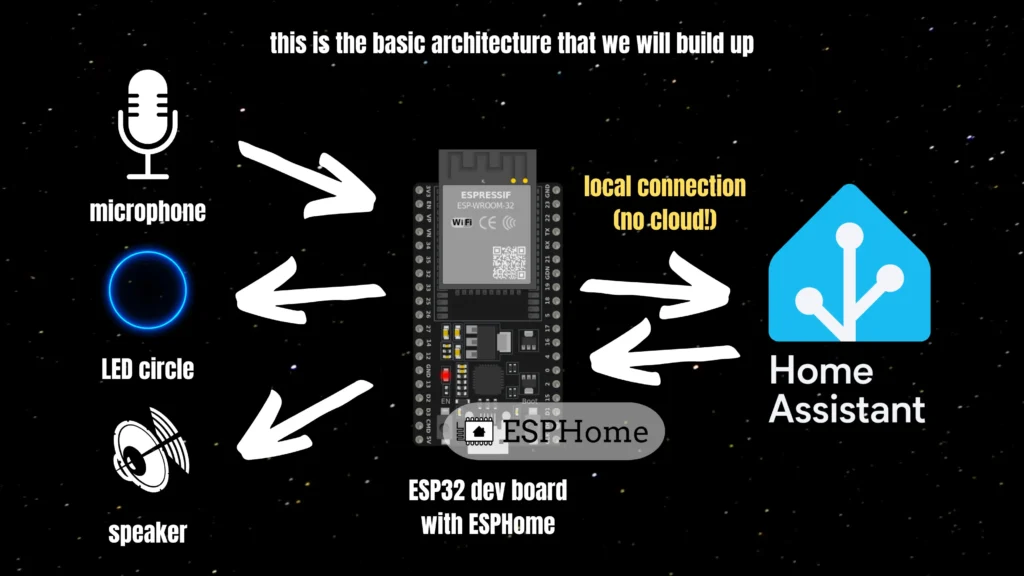
The following image illustrates the overall architecture of the system. At the heart of the architecture sits an ESP32 dev board with ESPHome installed. The ESP32 dev board is connected to a microphone (for recording your voice), an amplifier and a speaker (for answering back) and an LED circle (for displaying what’s going on). The ESP32 talks to Home Assistant and sends over the voice recordings in order to detect the wake word. If the wake word has been detected, it will be listening for commands.
Required parts & tools
- INMP441 microphone
- MAX98375A amplifier
- 5W speaker
- WS2812 RGB LED Ring
- ESP32 dev board (I use an ESP32 DEV Kit C NodeMCU)
- Homeassistant installation with ESPHome add-on installed (visit https://www.home-assistant.io/ and https://esphome.io/ for details how to set it up)
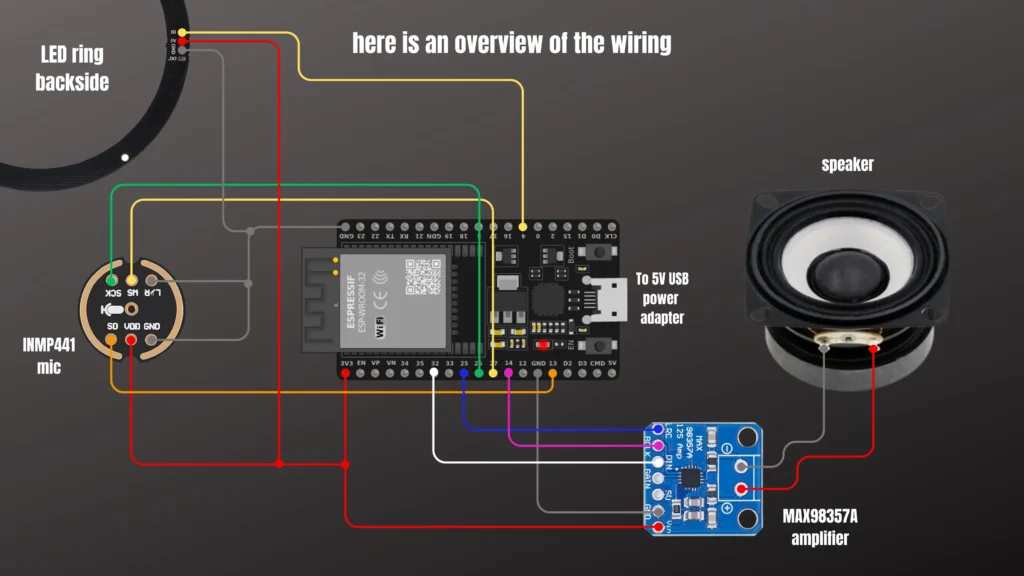
Step 1: Wiring
The following image illustrates exactly how to wire everything together. The pins I chose for connecting the microphone and the amplifier to the ESP32 are only exemplary. You could also use others but then you also have to adjust the YAML file (step 2).
Step 2: Write ESPHome YAML code
This is my example ESPHome YAML code for making the voice assistant as well as the LED ring work in a prototypical manner:
esphome:
  name: my-smart-speaker
  friendly_name: my-smart-speaker

esp32:
  board: esp32dev
  framework:
    type: arduino

# Enable logging
logger:
  level: DEBUG

# Enable Home Assistant API
api:
  encryption:
    key: <YOUR_ENCRYPTION_KEY>

ota:
  password: <YOUR_OTA_PASSWORD>

wifi:
  ssid: !secret wifi_ssid
  password: !secret wifi_password

  # Enable fallback hotspot (captive portal) in case wifi connection fails
  ap:
    ssid: "My-Smart-Speaker"
    password: <YOUR_HOTSPOT_FALLBACK_PASSWORD>

captive_portal:


i2s_audio:
  - id: i2s_in
    i2s_lrclk_pin: GPIO27
    i2s_bclk_pin: GPIO26
  - id: i2s_out
    i2s_lrclk_pin: GPIO25
    i2s_bclk_pin: GPIO14

microphone:
  - platform: i2s_audio
    i2s_audio_id: i2s_in
    adc_type: external
    pdm: false
    id: mic_i2s
    i2s_din_pin: GPIO13
    bits_per_sample: 32bit

speaker:
  - platform: i2s_audio
    i2s_audio_id: i2s_out
    id: speaker_i2s
    dac_type: external
    i2s_dout_pin: GPIO32
    mode: mono

voice_assistant:
  microphone: mic_i2s
  speaker: speaker_i2s
  use_wake_word: false
  noise_suppression_level: 3
  auto_gain: 31dBFS
  volume_multiplier: 2.0
  id: assist
  on_end:
  - light.turn_off:
      id: led_ring
  on_wake_word_detected:
  - light.addressable_set:
      id: led_ring
      range_from: 16
      range_to: 17
      red: 0%
      green: 0%
      blue: 100%
  - delay: 0.03s
  - light.addressable_set:
      id: led_ring
      range_from: 15
      range_to: 18
      red: 0%
      green: 0%
      blue: 100%
  - delay: 0.03s
  - light.addressable_set:
      id: led_ring
      range_from: 14
      range_to: 19
      red: 0%
      green: 0%
      blue: 100%
  - delay: 0.03s
  - light.addressable_set:
      id: led_ring
      range_from: 13
      range_to: 20
      red: 0%
      green: 0%
      blue: 100%
  - delay: 0.03s
  - light.addressable_set:
      id: led_ring
      range_from: 12
      range_to: 21
      red: 0%
      green: 0%
      blue: 100%
  - delay: 0.03s
  - light.addressable_set:
      id: led_ring
      range_from: 11
      range_to: 22
      red: 0%
      green: 0%
      blue: 100%
  - delay: 0.03s
  - light.addressable_set:
      id: led_ring
      range_from: 10
      range_to: 23
      red: 0%
      green: 0%
      blue: 100%
  - delay: 0.03s
  - light.addressable_set:
      id: led_ring
      range_from: 9
      range_to: 1
      red: 0%
      green: 0%
      blue: 100%
  - delay: 0.03s
  - light.addressable_set:
      id: led_ring
      range_from: 9
      range_to: 24
      red: 0%
      green: 0%
      blue: 100%
  - delay: 0.03s
  - light.addressable_set:
      id: led_ring
      range_from: 7
      range_to: 8
      red: 0%
      green: 50%
      blue: 50%
  - light.addressable_set:
      id: led_ring
      range_from: 0
      range_to: 1
      red: 0%
      green: 50%
      blue: 50%
  - delay: 0.1s
  - light.addressable_set:
      id: led_ring
      range_from: 2
      range_to: 6
      red: 0%
      green: 100%
      blue: 00%

switch:
  - platform: template
    name: Use wake word
    id: use_wake_word
    optimistic: true
    restore_mode: RESTORE_DEFAULT_ON
    entity_category: config
    on_turn_on:
      - lambda: id(assist).set_use_wake_word(true);
      - if:
          condition:
            not:
              - voice_assistant.is_running
          then:
            - voice_assistant.start_continuous
    on_turn_off:
      - voice_assistant.stop
      - lambda: id(assist).set_use_wake_word(false);

light:
  - platform: neopixelbus
    type: GRB
    variant: WS2812
    pin: GPIO4
    num_leds: 24
    name: "LED Ring"
id: "led_ring"After you have written the YAML code, you need to flash it to the ESP dev board. I don’t want to explain this here as there are already numerous tutorials out there which explain this in detail.
Step 3: Set up voice pipeline in Home Assistant
To set up a voice pipeline in Home Assistant, follow these steps:
- Install the Whisper and Piper add-ons via „Settings“ > „Add-ons“ – these add-ons are necessary for converting text to speech and vice versa. You then have to start the two add-ons
- Now head over to the „Settings“ > „Devices & Integrations“ section where you should see both Piper and Whisper auto discovered. Please click on „configure“ for both add-ons. You should now see both Piper and Whisper in your list of integrations.
- After that, you can go to „Settings“ > „Voice Assistant“ to set up a voice pipeline. Select „Add Assistant“.
- Now you have to give your assistant a name. Under „Conversation Agent“ please select „Home Assistant“. Under „Speech-to-Text“ please select „Whisper“ and under „Text-to-Speech“ please select „Piper“.
- Finally, please select a wake word. For part I of the series, we select a predefined wake word like „Alexa“.
Step 4: Play around with your new prototypical voice assistant!
Now you have set up a prototypical local voice assistant — congrats! I hope it works. Have fun playing around with it. If you encounter any problems please comment!
Part II of this tutorial series can be found here.
Leave a Reply