Never step into a scorching hot or freezing cold car again – automate your car’s climate control with Home Assistant

We’ve all been there – in summer, your car turns into an oven, and in winter, it’s an icebox with frozen windows. But with a smart Home Assistant automation, you can make sure your car is at the perfect temperature before you even get in.
In this step-by-step tutorial, I’ll show you how to use Home Assistant to track your distance from the car and trigger pre-conditioning automatically. You can choose whether the climate control starts fully automatically or if you receive a push notification, allowing you to activate it manually.
Let’s dive in!
Here is the full tutorial as a YouTube video and below you can find the text explanation:

Never step into a scorching hot or freezing cold car again – Automate Your Car’s Climate Control with Home Assistant
Requirements
To implement this automation, you need:
- A Connected Car with climate control or at least a parking heater that reports its location to the cloud.
- A Home Assistant installation.
- An integration of your car in Home Assistant, which allows both location tracking and climate control activation.
Configuring the Sensor in Home Assistant
Next, we will create a Template Sensor in Home Assistant. This sensor calculates the distance between the driver’s smartphone and the vehicle. The following code is added under the sensor node in the configuration.yaml:
sensor:
  - platform: template
    sensors:
      distance_between_devices:
        friendly_name: "Distance The Smart Home Maker to his car"
        unit_of_measurement: "m"
        icon_template: "mdi:map-marker-distance"
        value_template: >-
          {% set lat1 = state_attr('device_tracker.<id_of_car_position_entity>', 'latitude') %}
          {% set lon1 = state_attr('device_tracker.<id_of_car_position_entity>', 'longitude') %}
          {% set lat2 = state_attr('device_tracker.<id_of_smartphone_position_entity>', 'latitude') %}
          {% set lon2 = state_attr('device_tracker.<id_of_smartphone_position_entity>', 'longitude') %}
          {% if lat1 is not none and lon1 is not none and lat2 is not none and lon2 is not none %}
            {% set dist_km = distance(lat1, lon1, lat2, lon2) %}
            {% set dist_m = (dist_km * 1000) | round(1) %}
            {{ dist_m }}
          {% else %}
            unknown
          {% endif %}
Replace <id_of_car_position_entity> and <id_of_smartphone_position_entity> with the actual entity IDs of your device trackers.
After saving configuration.yaml, restart Home Assistant.
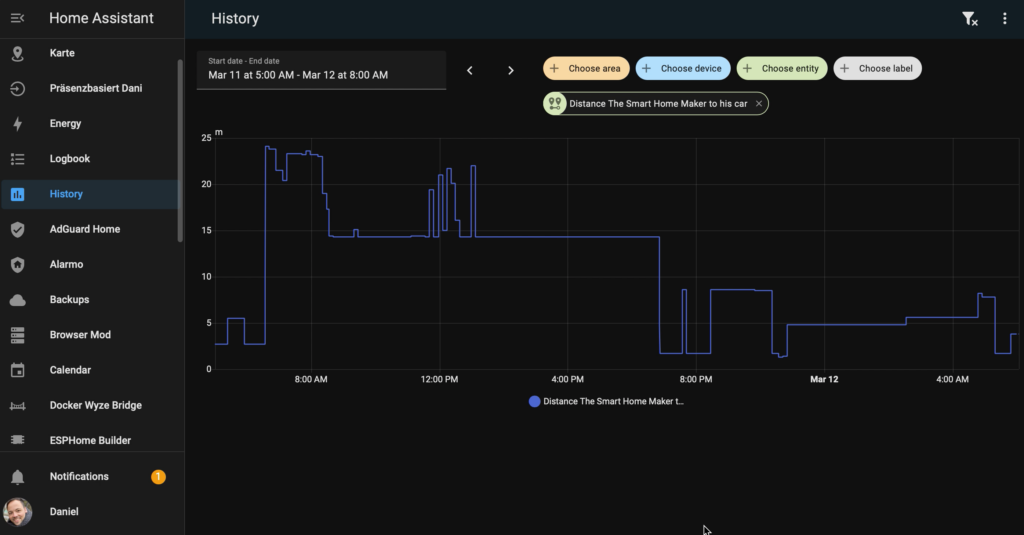
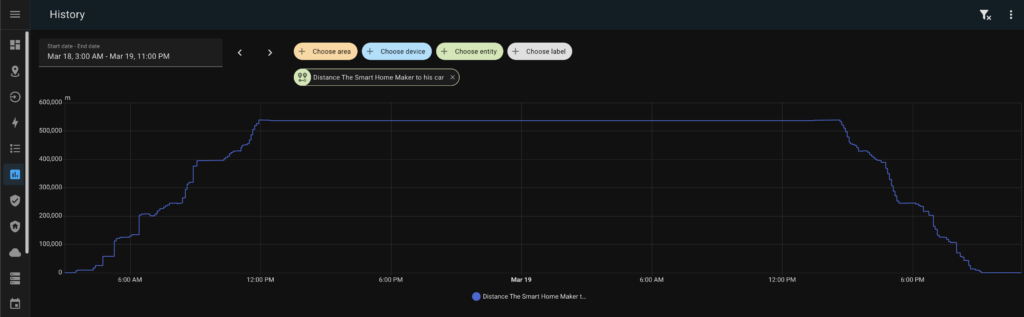
Viewing Sensor Data
After restarting, you can monitor the sensor values over time using the History function in Home Assistant. This helps verify that the sensor is providing accurate readings. Example scenarios:
- A normal workday commute.
- A business trip by train, while the car remains at home.
Creating the Automation
Now, we create an automation that activates the car’s climate control when the distance threshold is crossed. There are two versions:
Option 1: Fully Automatic Activation
alias: If getting close to car, start climatization
description: "If I am getting close to my car, automatically start the climatization of the car"
triggers:
  - trigger: numeric_state
    entity_id:
      - sensor.distance_between_devices
    below: 20
conditions:
  - condition: template
    value_template: |-
      {% set my_location = states('device_tracker.<id_of_smartphone_position_entity>') %}
      {{ my_location not in ['home', 'work'] }}
actions:
  - action: climate.turn_on
    metadata: {}
    data: {}
    target:
      entity_id: climate.<id_of_car_climate_entity>
mode: single
Option 2: Semi-Automatic Activation with Push Notification
alias: Auto start car climatization actionable push
description: "If I get closer to my car, send me a push notification that asks me whether I want to activate the climatization. If pressing a button in the push notification, climatization will be activated."
triggers:
  - trigger: numeric_state
    entity_id:
      - sensor.distance_between_devices
    below: 20
    id: Threshold_reached
  - trigger: event
    event_type: mobile_app_notification_action
    id: Confirmed
    event_data:
      action: CONFIRMED_TURN_ON_CAR_CLIMATIZATION
conditions:
  - condition: template
    value_template: |-
      {% set my_location = states('device_tracker.<id_of_smartphone_location_entity>') %}
      {{ my_location not in ['home', 'work'] }}
actions:
  - choose:
      - conditions:
          - condition: trigger
            id:
              - Threshold_reached
        sequence:
          - action: notify.<id_of_smartphone_notify_entity>
            metadata: {}
            data:
              message: >-
                You are getting closer to your car - shall climatization be activated?
              title: Start climatization of car?
              data:
                actions:
                  - action: CONFIRMED_TURN_ON_CAR_CLIMATIZATION
                    title: Yes, turn it on
      - conditions:
          - condition: trigger
            id:
              - Confirmed
        sequence:
          - action: climate.turn_on
            metadata: {}
            data: {}
            target:
              entity_id: climate.<id_of_car_climate_entity>
mode: single
Conclusion and Feedback
That’s it – with this automation, your car’s climate control will start exactly when needed. You can further customize it by adjusting the distance threshold or adding additional conditions.
Do you have questions or suggestions for improvement? Leave a comment! And if you want more smart Home Assistant tutorials, follow me on YouTube, Instagram, or TikTok!
Leave a Reply